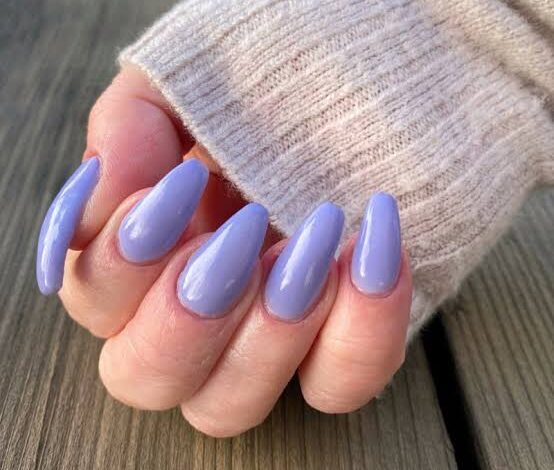
Creating a salon-quality dip powder manicure at home is achievable with the correct tools and products. Thus, the dip nail kit paper bag which is very strong in the nature and also can be produced in more colors, has seen gains in the popularity because the application process is pretty simple. Regardless if you have a wide experience at nail painting at home or if you are just starting up, having a nail polish kit is very important for obtaining quality result. Therefore, go ahead and browse what I present to you in this article so that one can find the essential products that will allow him/her to do manicure easily and beautifully, from the comfort of your own.


Prepping Essentials
- Nail Files and Buffers: Well-prepped nails are the foundation of a great dip powder manicure. The files help shape your nails to your desired length and shape while buffers smooth out the surface for an even application. Opt for a medium-grit file for shaping and an acceptable-grit buffer to create a smooth canvas.
- Cuticle Pusher and Nipper: Pushing back and trimming any excess cuticle skin ensures the dip powder adheres properly to the surface, preventing lifting and providing a neat, clean look.
- Bonding Agents: Most kits come with a set of liquids, including a dehydrator and a bonding agent. The dehydrator eliminates moisture and oils from the surface, creating a strong attachment between your nail and the powder.
The Core Kit
- Base and Top Coats: The base coat is what you apply before putting your nails into the powder, acting as the adhesive layer. The top coat seals in the colour, providing a glossy finish and adding durability to the manicure.
- Dip Powder: The show’s star dip powders come in various colours and finishes. From vibrant colours to subtle nudes, glitter, and even glow-in-the-dark, there’s a powder for every preference. Consider purchasing a few colours to start your collection.
- Activator: This liquid hardens the powder and cures the base and top coat without UV light. It transforms the soft powder into a hard, durable layer on your skin’s surface.
Additional Tools and Accessories
- Dust Brush: Remove the excess powder before applying the activator. A soft brush ensures you can gently dust off the powder without smudging your application.
- Nail Protectors or Dip Containers: Some kits have protectors that allow you to apply the powder more precisely. Alternatively, a separate dip container can be helpful if you’re mixing custom colours or need more control over the dipping process.
- Nail Tips and Glue: Having tips and glue in your kit can instantly elevate your manicure. Ensure the glue is specially formulated for tips to avoid damage to your natural nails.
Care and Maintenance
Nourishing Cuticle Oil: The process of dip powder manicure could be ended with the help of cuticle oil which ensures rejuvenation and well being of cuticles. Skin should be given the emphasis of care which should be a priority to all who do the manicure and pedicure. The use of dehydrators and acetone should not hinder how all should be taking care of the skin
Acetone: When it is ready to take dip powder manicure off, acetone will be in demand. It does the breaking of the powder and is good for removing it without affecting human nails underneath. Experience better outcomes by going for 100% undiluted acetone.
Optional Enhancements
Gel Top Coat: People incline towards applying a gloopy top layer coat along their dip powder manicure to strengthen the shine of nails and assure further resistance. This purpose needs UV or LED lamp wich is used to cure.
Decorative Elements: Rhinestones, stickers and nail figures are good ways to make your manicure talking. Such treatments could be used either at the base coat and a powder finishing or at the topcoat for the decoration.
Developing the best DIY dip nail kit may be seen as a big initial charge; however, with the creativity you can now bring to your nail sets, no one could argue that it is worth the investment. Just start with the most basic initially. Afterward, explore what works best for your style and start looking for different hair styling tools and shades. The plan is to make the selection akin to going from start to finish with the simple essentials and gradually adding in more implements and colours that will help you find the tools and the hues that you are comfortable with.